Summary– Implementing and Managing Authentication

In this chapter, you learned how to evaluate passwordless sign-in options for your organization and deploy the ones that best suit your needs. Some passwordless options, such as Windows Hello or FIDO2 keys, may require specialized hardware such as cameras, USB devices, or fingerprint readers, while the Microsoft Authenticator app method requires only the Microsoft Authenticator app on any supported Android or iOS-based device.

You also learned about deploying features such as self-service password reset and Azure AD password protection to further reduce administrative overhead, helping your organization comply with security policies.

In the next chapter, you’ll learn about implementing secure access in the context of Microsoft 365.

Exam Readiness Drill – Chapter Review Questions Benchmark Score: 75%

Apart from a solid understanding of key concepts, being able to think quickly under time pressure is a skill that will help you ace your certification exam. That’s why, working on these skills early on in your learning journey is key.

Chapter review questions are designed to improve your test-taking skills progressively with each chapter you learn and review your understanding of key concepts in the chapter at the same time. You’ll find these at the end of each chapter.

Before You Proceed

You need to unlock these resources before you start using them. Unlocking takes less than 10 minutes, can be done from any device, and needs to be done only once. Head over to the start of Chapter 7, Managing Security Reports and Alerts by Using the Microsoft 365 Defender Portal in this book for instructions on how to unlock them.

To open the Chapter Review Questions for this chapter, click the following link:

https://packt.link/MS102E1_Ch05. Or, you can scan the following QR code:

Figure 5.34 – QR code that opens Chapter Review Questions for logged-in users

Once you login, you’ll see a page similar to what is shown in Figure 5.35:
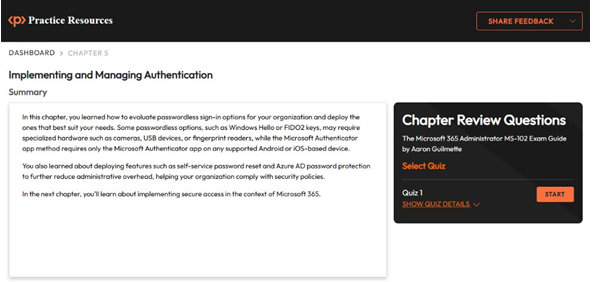
Figure 5.35 – Chapter Review Questions for Chapter 5

Once ready, start the following practice drills, re-attempting the quiz multiple times:

Exam Readiness Drill
For the first 3 attempts, don’t worry about the time limit.

ATTEMPT 1
The first time, aim for at least 40%. Look at the answers you got wrong and read the relevant sections in the chapter again to fix your learning gaps.

ATTEMPT 2
The second time, aim for at least 60%. Look at the answers you got wrong and read the relevant sections in the chapter again to fix any remaining learning gaps.

ATTEMPT 3 The third time, aim for at least 75%. Once you score 75% or more, you start working on your timing.

Tip You may take more than 3 attempts to reach 75%. That’s okay. Just review the relevant sections in the chapter till you get there.

Working On Timing

Target: Your aim is to keep the score the same while trying to answer these questions as quickly as possible. Here’s an example of how your next attempts should look like:

Table 5.4 – Sample timing practice drills on the online platform

Note
The time limits shown in the above table are just examples. Set your own time limits with each attempt based on the time limit of the quiz on the website.

With each new attempt, your score should stay above 75% while your time taken to complete should decrease. Repeat as many attempts as you want till you feel confident dealing with the time pressure.
On-premises integration– Implementing and Managing Authentication

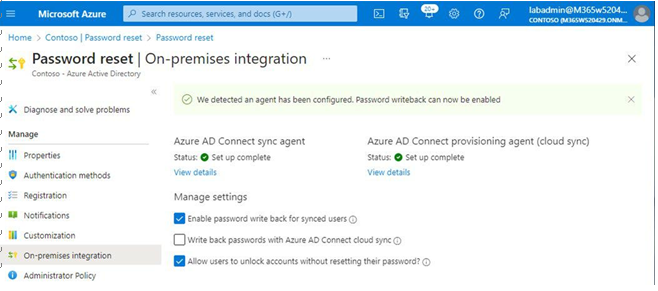
If you have configured Azure AD Connect or Azure AD Connect Cloud sync with your organization, you can manage SSPR integration features, as shown in Figure 5.23:

Figure 5.23 – On-premises integration

It’s important to note that the Enable password write back for synced users option only modifies the behavior of Azure AD sending password reset data back to the on-premises environment, effectively stopping on-premises integration. It does not modify the on-premises Azure AD Connect configuration.

Next, you’ll look at the features of Azure AD password protection.

Implementing and Managing Azure AD Password Protection

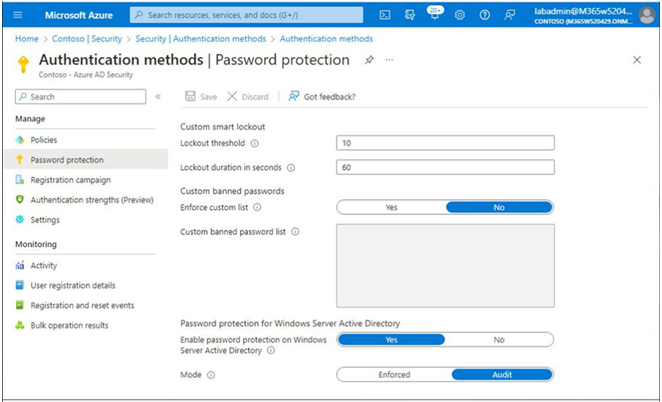
Azure AD password protection is a set of features designed to limit the effects of common password attacks. To view the password protection configuration, navigate to Azure Active Directory | Security | Authentication methods and select Password protection. See Figure 5.24:

Figure 5.24 – Password protection

There are three groups of settings to configure:

• Custom smart lockout
• Custom banned passwords
• Password protection for Windows Server Active Directory

Let’s briefly examine each set of configurations.

Custom smart lockout

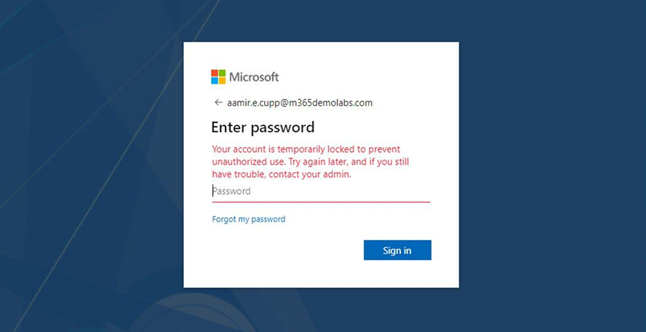
The smart lockout settings determine how Azure Active Directory handles failed login attempts. Lockout threshold is the number of times in a row a user can enter a bad password before getting locked out. By default, Lockout threshold is set to 10 in Azure Worldwide (sometimes referred to as Commercial or Public) and Azure China 21Vianet tenants, while it is set at 3 for Azure US for Government customers. Figure 5.25 depicts the error message displayed when the bad password threshold is met:

Figure 5.25 – Account lockout

Lockout duration in seconds only specifies the initial lockout duration after the lockout threshold has been reached. Each subsequent lockout increases the lockout duration. As a security mechanism, Microsoft does not publish the rate at which the duration increases.

Custom banned passwords
While Microsoft recommends moving toward passwordless authentication as a primary mechanism, passwords are still required to be configured in a number of scenarios. To help minimize using well-known, weak, or easily guessable passwords, you can choose to specify a custom list of words that you want to exclude from being used as passwords. For example, you may wish to include your organization’s name or abbreviation, products or services offered by your organization, or local sports teams.

To enable the option, slide the Enforce custom list toggle to Yes, and then add up to 1,000 banned words in the Custom banned password list text area. The list is not case-sensitive. Azure AD automatically performs common substitutions (such as 0 and o or 3 and e), so you do not need to think of all of the possible ways a word can be represented.

Configuring Windows Hello– Implementing and Managing Authentication

WHFB supports cloud-only, hybrid Azure AD, and on- premises deployments. The easiest method to deploy Windows Hello is in a cloud-only model since the Microsoft 365 organization is set up for it automatically. You’ll look at that scenario in this section.

During the out-of-box experience (OOBE), users are prompted for credentials. After providing an Azure AD credential, if the Intune enrollment policy has not been configured to block WHFB, the user will be prompted to enroll with their biometric data (such as a facial scan with a compatible camera) and set a PIN.

Devices will be joined to Azure AD during the initial sign-in process and WHFB will be enabled.

If your subscription supports it, Microsoft recommends creating a WHFB policy to configure settings for your organization:

1.Navigate to the Intune admin center (https://intune.microsoft.com or https://endpoint.microsoft.com).

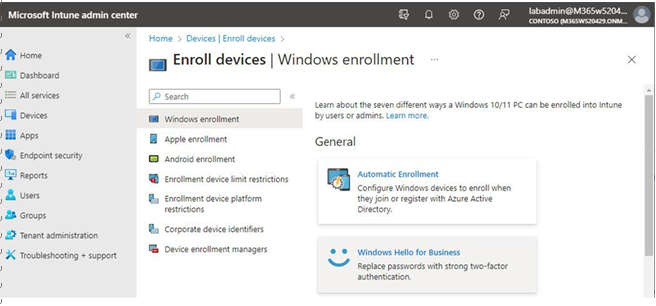
    2. Expand Devices and, under Device enrollment, select Enroll devices, as shown in Figure 5.7:

    Figure 5.7 – Enroll devices

    3. Select Windows enrollment and then choose Windows Hello for Business, as shown in Figure 5.8:

    Figure 5.8 – Windows Hello for Business

    4. Under Assigned to, select a group (if scoping the enrollment policy to a subset of users).

    5. Configure the options for Windows Hello for Business (italics options are the default settings for the enrollment policy):

    • Configure Windows Hello for Business: Enabled, Disabled, Not Configured
    • Use a Trusted Platform Module (TPM): Required, Preferred
    • Minimum PIN length: Configure a numeric value between 4 and 127.
    • Maximum PIN length: Configure a numeric value between 4 and 127.
    • Lowercase letters in PIN: Not allowed, Allowed, Required
    • Uppercase letters in PIN: Not allowed, Allowed, Required
    • Special characters in PIN: Not allowed, Allowed, Required
    • PIN expiration (days): Never, a numeric value between 1 and 730
    • Remember PIN history: Never, a numeric value between 1 and 50
    • Allow biometric authentication: Yes, No
    • Use enhanced anti-spoofing, when available: Not configured, Yes, No
    • Allow phone sign-in: Yes, No
    • Use security keys for sign-in: Not configured, Enabled, Disabled

    6. Click Save to update the enrollment policy.

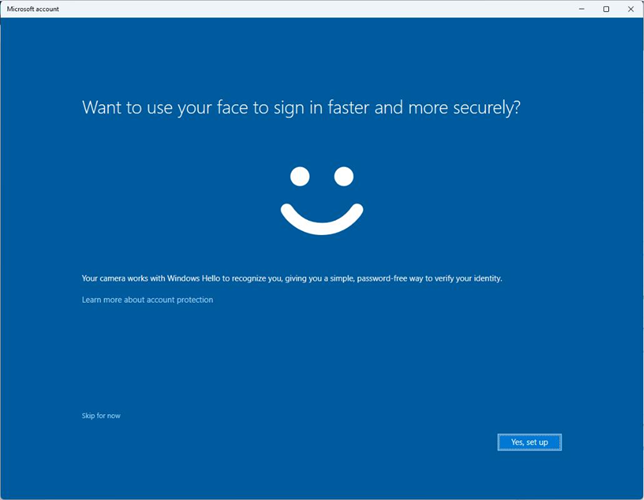
    With the policy configured, new device enrollments (for the configured user group) will receive the Windows Hello for Business setup prompt to begin enrollment, as shown in Figure 5.9:

    Figure 5.9 – Windows Hello for Business enrollment

    After completing enrollment, users will be able to unlock and log in to devices using supported biometrics or their PIN.

    Users that are already connected to Azure AD can also trigger the Windows Hello setup wizard, by either navigating to the Account protection blade in the Windows Settings app or by pressing Win+R and entering ms-cxh://nthaad in the Run dialog box.

    Next, you’ll look at configuring Microsoft  Authenticator for passwordless sign-in.

    Configuring Microsoft Authenticator

    The Microsoft Authenticator app provides a convenient way to sign in to any Azure AD account with a supported mobile device. Before users can sign in using the method, however, it will need to be enabled in your tenant through the authentication policy.

    Azure AD Connect Health for Active Directory Federation Services– Implementing and Managing Identity Synchronization with Azure AD

    In addition to gathering and reporting information for your on-premises AD and synchronization services, Azure AD Connect Health also supports AD FS.

    To get the most out of Azure AD Connect Health for AD FS, you’ll need to enable auditing, which involves three steps:

    1.Ensure the AD FS farm service account has been granted the Generate security audits right in the security policy (Local Policies | User Rights Assignment | Generate security audits).

      2. From an elevated command prompt, run the following command: auditpol.exe /set / subcategory:{0CCE9222-69AE-11D9-BED3-505054503030} /failure:enable /success:enable.

      3. On the AD FS primary farm server, open an elevated PowerShell prompt and run the following command: Set-AdfsProperties -AuditLevel Verbose.

      Then, you can deploy the agents to your servers.

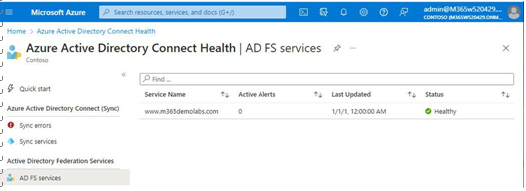
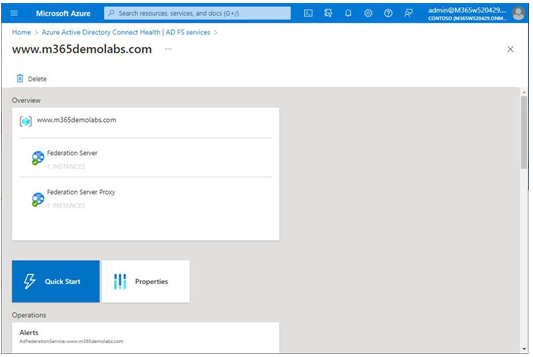
      After deploying the agents to your federation and proxy servers, you will see information reported in the Azure AD Connect Health portal by selecting AD FS services under the Active Directory Federation Services section, as shown in Figure 4.21:

      Figure 4.21 – Azure AD Connect Health for AD FS

      In addition to diagnostic information, the health services for AD FS can also provide usage analytics and performance monitoring, as well as failed logins and information regarding risky sign-ins. See Figure 4.22:

      Figure 4.22 – Azure AD Connect Health for AD FS overview

      Azure AD Connect Health is a valuable premium service that can help you keep on top of the health and performance aspects of your hybrid identity deployment.

      Troubleshooting Azure AD Connect Synchronization

      While things normally operate smoothly, there may be times when objects become misconfigured, or services go offline unexpectedly. You can troubleshoot common issues with Azure AD Connect’s built-in troubleshooting tool.

      To launch the troubleshooting tool, follow these steps:

      1.Launch the Azure AD Connect configuration tool on the desktop of the server where Azure AD Connect is installed.

        2. Click Configure.

        3. On the Additional tasks page, select Troubleshoot and then click Next.

        4. On the Welcome to AADConnect Troubleshooting page, select Launch, as shown in Figure 4.23:

        Figure 4.23 – Launching the AADConnect Troubleshooting tool

        5. Select the appropriate troubleshooting option from the menu shown in Figure 4.24:

        Figure 4.24 – AADConnect Troubleshooting menu

        The AADConnect Troubleshooting tool provides several specific troubleshooters, such as diagnosing attribute or group membership synchronization, password hash synchronization, as well as service account permissions.

        Most object or attribute troubleshooting routines will require the errored object’s distinguished name to continue.

        Further Reading

        For more information on the tests that can be performed by the AADConnect Troubleshooting tool, see https://learn.microsoft.com/en-us/azure/active-directory/ hybrid/tshoot-connect-objectsync.

        Configuring and Managing Directory Synchronization by Using Azure AD Connect Cloud Sync

        Azure AD Connect Cloud Sync (rebranded as Microsoft Entra Cloud Sync) is a new synchronization platform that allows you to manage directory synchronization from the Azure portal. Depending on your organization’s goals and environments, Azure AD Connect Cloud Sync can be a lightweight, flexible option that allows you to begin directory synchronization quickly.

        Exam Tip

        To perform the installation, you’ll need either Domain Admin or Enterprise Admin credentials to the on-premises Active Directory forest so that the installer can create the group Managed Service Account (gMSA). You’ll also need an account that has either the Global Administratoror Hybrid Identity Administrator roles in Azure AD.

        Microsoft recommends configuring a unique identity in Azure AD with the Hybrid Identity Administrator role for Azure AD Connect Cloud Sync.

        Implementing and Managing Authentication Methods– Implementing and Managing Authentication

        After onboarding identity and configuring multifactor authentication requirements, you can begin deployment.

        Exam Note

        Full deployment and configuration of these methods are outside the scope of the MS-102 exam, but it would be good to spend a little bit of time reviewing the product documentation for deeper dives into how passwordless authentication works. See https://learn.microsoft. com/en-us/entra/identity/authentication/concept-authentication-passwordless for further information.

        Let’s go through an overview of the configurations necessary to enable passwordless authentication methods.

        Choosing an Authentication Mechanism

        Everyone is familiar with using an identity and a corresponding password to log in to a device, service, application, or website—whether it’s a bank website, Facebook, Xbox Live, or even just a local computer. While Microsoft 365 supports traditional username and password authentication mechanisms, there are newer methods that provide fewer opportunities for malicious users to compromise identities, applications, and devices.

        Microsoft has long advocated for using multifactor authentication as part of the logon process to help secure identities—that is, using some sort of supplementary logon tool (such as a token, authenticator app, phone call, or text message) to confirm the logon process. The weakest link in this chain is the password—and interfaces unable to leverage the multifactor authentication process are more susceptible to bad actors.

        With Microsoft’s newest passwordless technologies, users get the advantage of multifactor authentication (something you have, something you know, or something you are) without the frustration of remembering complex passwords. Microsoft supports several different approaches to passwordless logon, including Windows Hello for Business (WHFB), the Microsoft Authenticator app, and Fast Identity Online 2 (FIDO2)-compatible security keys or tokens.

        Microsoft passwordless options are based on apublic key infrastructure (PKI) design, comprising a private key (managed and stored by the user’s device) and a public key saved in Azure AD. The keys are linked and only work with each other. When an entity (be it a user or device) establishes a public/ private key pair, the public key can be broadly distributed to all other entities that the owner of the key pair wishes to communicate with.

        Each key has two purposes:

        • The public key is used to encrypt data. Only the corresponding private key can decrypt it.
        • The private key is used to sign data. Only the corresponding public key can authenticate or verify the signature, offering proof that a particular private key produced it.

        For example, let’s say you establish a public/private key pair and you wish to conduct secure email communication. You distribute the public key to everyone you will communicate with. You might even add it to your email signature, post it on a blog, or store it in a directory where others can look it up.

        The following examples demonstrate possible uses for public key cryptography in the context of email:

        • You’re sending out an important product announcement update on behalf of your organization and you want people to be certain it’s authentic. You sign the email with your private key. Recipients who already have your public key (or who can retrieve it from your website or a directory) can use the public key to check the signature on your email. Since only your private key matches that well-known public key, recipients can be assured that your private key was used to sign the content.
        • You’re in the process of acquiring financing for a new business venture. The lender has prepared documents for you to review. Since they contain sensitive financial information, the lender wants to make sure that only you can open them. They encrypt the content with your public key and email you the documents. Since only your private key is able to decrypt the content, both entities can be assured that the content will be unreadable to anyone else.

        Those types of scenarios are very analogous to what happens when using PKI-based sign-on methods such as Windows Hello—but instead of signing and encrypting email, it’s used for authentication data.

        In this section, you’ll explore a little bit about each of these mechanisms to help you decide which is appropriate for your organization.

        Attribute-Based Filtering– Implementing and Managing Identity Synchronization with Azure AD

        Another way to prevent objects from being synchronized to Azure AD is using an attribute filter. This advanced method requires creating a custom synchronization rule in the Azure AD Connect Synchronization Rules Editor.

        To create an attribute-based filtering rule, select an attribute that isn’t currently being used by your organization for another purpose. You can use this attribute as a scoping filter to exclude objects. The following procedure can be used to create a simple filtering rule:

        1.On the server running Azure AD Connect, launch the Synchronization Rules Editor.

          2. Under Direction, select Inbound and then click Add new rule. See Figure 4.11:

          Figure 4.11 – Synchronization rules editor

          3. Provide a name and description for the rule.

          4. Under Connected System, select the object that represents your on-premises Active Directory forest.

          5. Under Connected System Object Type, select user.

          6. Under Metaverse Object Type, select person.

          7. Under Link Type, select Join.

          8. In the Precedence text field, enter an unused number (such as 50) , as shown in Figure 4.12. Click Next.

          Figure 4.12 – Creating a new inbound synchronization rule

          9. On the Scoping filter page, click Add group and then click Add clause.

          10. Under Attribute, select extensionAttribute1 (or whichever unused attribute you have selected).

          11. Under Operator, select EQUAL.

          12. In the Value text field, enter NOSYNC, as shown in Figure 4.13 and then click Next.

            Figure 4.13 – Configuring a scoping filter for extensionAttribute1

            13. On the Join rules page, click Next without adding any parameters.

            14. On the Transformations page, click Add transformation.

            15. Under FlowType, select Constant.

            16. Under Target Attribute, select cloudFiltered.

            17. In the Source text field, enter the value True. Click Add.

              Figure 4.14 – Adding a transformation for the cloudFiltered attribute

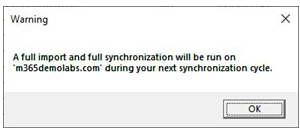
              18. Acknowledge the warning that a full import and synchronization cycle will be required by clicking OK. See Figure 4.15:

                Figure 4.15 – Warning for full import and synchronization

                After modifying the synchronization rule, a full import and full synchronization is required. You don’t have to perform any special steps, however; Azure AD Connect is aware of the update and will automatically perform the necessary full imports and synchronizations.

                Monitoring Synchronization by Using Azure AD Connect Health

                Azure AD Connect Health is a premium feature of the Azure AD license. Azure AD Connect Health has separate agent features for Azure AD Connect, Azure AD Health for Directory Services (DS), and Azure AD Health for AD FS.

                Attribute Mapping– Implementing and Managing Identity Synchronization with Azure AD

                Another customization option available involves mapping attribute values between on-premises and cloud objects. As with Azure AD Connect, you can configure how cloud attributes are populated—whether it’s from a source attribute, a constant value, or some sort of expression.

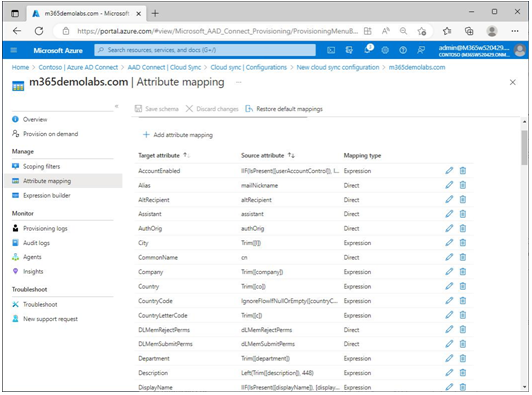
                Azure AD Connect sync comes with a default attribute mapping flow, as shown in Figure 4.33:

                Figure 4.33 – Azure AD Connect Cloud Sync attribute mappings

                You can select an existing attribute to modify or create a new attribute flow. One of the basic configuration features for most attributes is to configure a Default value (if the on-premises value is blank), allowing you to make certain that cloud attributes are populated with values.

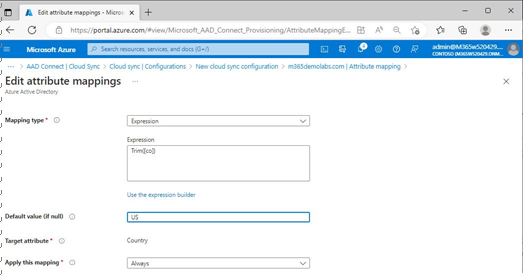
                In Figure 4.34, the Country attribute has been selected and updated with the default value US. This ensures that in the event a user’s on-premises country attribute is blank, the corresponding cloud attribute will be populated with a valid entry.

                Figure 4.34 – Edit attribute mappings in Azure AD Connect Cloud Sync

                Azure AD Connect Cloud Sync also features an expression builder, allowing you to create your own custom attribute flows.

                Unlike Azure AD Connect, however, attribute mappings and expressions cannot be used to merge attributes from different domains or forests, nor does Azure AD Connect Cloud Sync support synchronization rules or attribute flow precedence. If you require that level of customization, you should deploy Azure AD Connect instead.

                Once you have finished customizing the scoping filters and attribute flows, you can return to the Overview page and enable synchronization by selecting Review and enable.

                Troubleshooting Azure AD Connect Cloud Sync Synchronization

                Just as Azure AD Connect may experience issues with synchronizing identity, Azure AD Connect Cloud Sync can as well. Successful synchronization depends on several factors:

                • Agent functionality: Is the agent installed and functioning normally?
                • Network communications: Can the agent reach all of the required endpoints and resolve DNS for Azure AD services?
                • Service account issues: Does the service account have the appropriate rights to the on-premises objects?

                When troubleshooting the Azure AD Connect Cloud Sync service, you should start with the Windows Event Viewer to determine whether there are any errors related to the service, such as invalid credentials or missing privileges.

                While Microsoft generally recommends bypassing proxy and content filtering services for Microsoft 365 endpoints, your organization may still choose to deploy them. In the event that the server for the Azure AD Connect Cloud Sync agent is located behind a proxy server or appliance, it may become necessary to modify the service configuration file with the proxy’s information.

                The Azure AD Connect Cloud Sync provisioning agent utilizes a configuration file stored in

                C:\Program Files\Microsoft Azure AD Connect Provisioning Agent\ AADConnectProvisioningAgent.exe.config. To add proxy configuration information, edit this file, and before the closing </configuration> tag, enter the following data (replacing

                [proxy-server] and [proxy-port]) with the proxy server or appliance address and network port:

                <system.net><defaultProxyenabled=”true”useDefaultCredentials=”true”><proxyusesystemdefault=”true”proxyaddress=”http://[proxy-server]:[proxy-port]”bypassonlocal=”true”/></defaultProxy></system.net>

                If you need to perform deeper troubleshooting for the agent, you can install the AADCloudSyncTools PowerShell module. The AADCloudSyncTools module has a number of functions in it for configuringand gathering verbose logging data, configuring the sync schedule, and repairing the service account. For more information on the functions supported by the cmdlet, see https://learn.microsoft.com/ en-us/azure/active-directory/hybrid/cloud-sync/reference-powershell.

                Configuring Azure AD Connect Filters– Implementing and Managing Identity Synchronization with Azure AD

                If you need to exclude objects from Azure AD Connect’s synchronization scope, you can do that through a number of different methods:

                • Domain and organizational unit-based filtering
                • Group-based filtering
                • Attribute-based filtering

                Let’s quickly examine these.

                Domain and Organizational Unit-Based Filtering

                With this method, you can deselect large portions of your directory by modifying the list of domains or organizational units that are selected for synchronization. While there are several ways to do this, the easiest way is through the Azure AD Connect setup and configuration tool:

                1.To launch the Azure AD Connect configuration tool, double-click the Azure AD Connect icon on the desktop of the server where Azure AD Connect is installed. After it launches, click Configure.

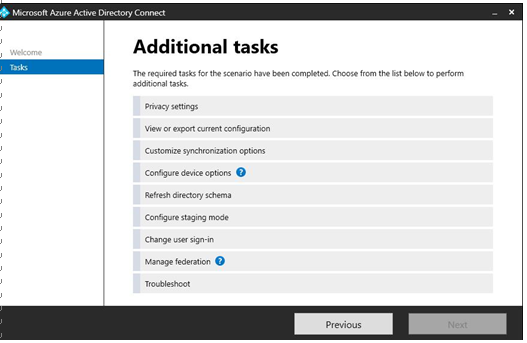
                  2. On the Additional tasks page, as shown in Figure 4.8, select Customize synchronization options and then click Next.

                  Figure 4.8 – Additional tasks page

                  3. On the Connect to Azure AD page, enter credentials for either the Global Administrator or Hybrid Identity Administrator role and click Next.

                  4. On the Connect your directories page, click Next.

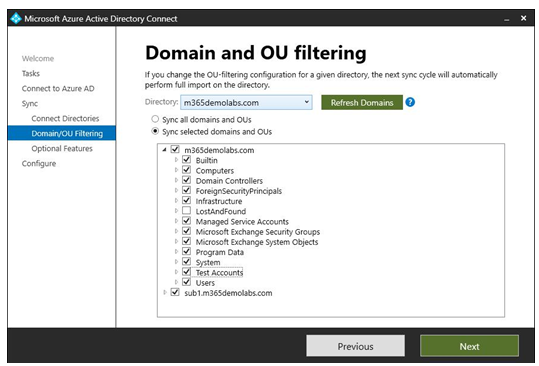
                  5. On the Domain and OU filtering page, as shown in Figure 4.9, select the Sync selected domains and OUs radio button and then select or clear objects to include or exclude from synchronization.

                  Figure 4.9 – Azure AD Connect Domain and OU filtering page

                  6. Click Next.

                  7. On the Optional features page, click Next.

                  8. On the Ready to configure page, click Configure.

                  After synchronization is completed, verify that only objects from in-scope organizational units or domains are present in Azure Active Directory.

                  Group-Based Filtering

                  Azure AD Connect only supports the configuration of group-based filtering if you choose to customize the Azure AD Connect setup. Group-based filtering is not available if you perform an express installation.

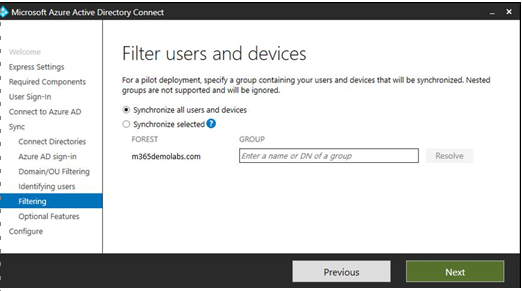
                  If you’ve chosen a custom installation, you can choose to limit the synchronization scope to a single group. On the Filter users and devices page of the configuration wizard, select the default radio button, Synchronize all users and devices, to continue without group filtering. You can also choose the Synchronize selected radio button and then enter the name or distinguishedName (DN) of a group that contains the users and devices to be synchronized.

                  Figure 4.10 – Filter users and devices page

                  With group-based filtering, only direct members of the group are synchronized. Users, groups, contacts, or devices nested inside other groups are not resolved or synchronized.

                  Note

                  Microsoft recommends group-based filtering for piloting purposes only.

                  Azure AD Connect Health– Implementing and Managing Identity Synchronization with Azure AD

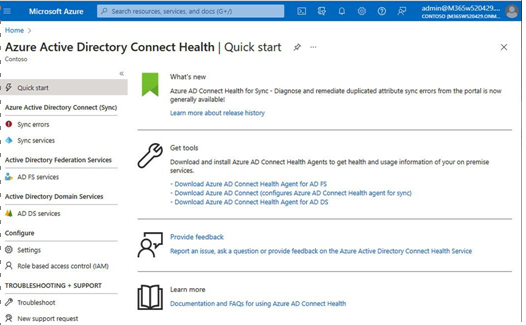
                  You can browse the Azure AD Connect Health portal at https://aka.ms/aadconnecthealth. From there, you will be able to view basic details about your environment as well as obtain agent installation packages. See Figure 4.16:

                  Figure 4.16 – Azure Active Directory Connect Health

                  While Azure AD Connect Health Agent for Sync is included in the Azure AD Connect installation, the health agents for DS and AD FS are separate installations and must be downloaded separately:

                  If you do not have AD FS deployed in your environment, you do not need to deploy the AD FS agents.

                  Azure AD Connect Health for Sync

                  The core health product, Azure AD Connect Health for Sync, shows the current health of your synchronization environment, including object synchronization problems and data-related errors.

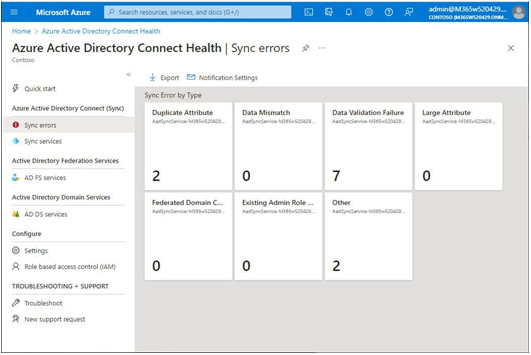
                  You can view the health status and identified errors by selecting Sync errors under Azure Active Directory Connect (Sync) in the Azure AD Connect Health portal (https://aka.ms/aadconnecthealth), as shown in Figure 4.17:

                  Figure 4.17 – Azure AD Connect Health Sync errors

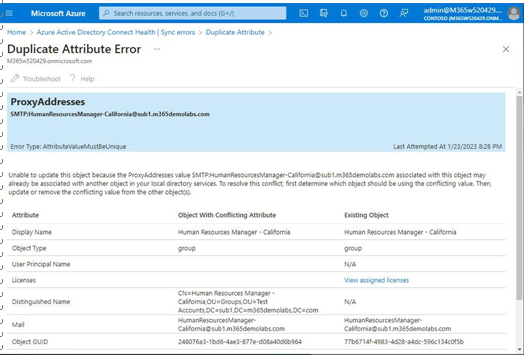
                  Selecting an error type will allow you to drill down into individual errors. Figure 4.18 shows an example where Azure AD Connect Health has detected two objects with the same address:

                  Figure 4.18 – Azure AD Connect Health error details

                  You can use this information to identify and troubleshoot on-premises objects.

                  Azure AD Connect Health for Directory Services

                  Microsoft recommends deploying Azure AD Connect Health for DS agents on all domain controllers you want to monitor, or at least one for each domain.

                  The Azure AD Connect Health agent deployment is relatively straightforward, asking only for credentials to complete the installation. Once the installation is complete, you can review details about your domain controller’s health in the Azure AD Connect Health portal at https://aka. ms/aadconnecthealth.

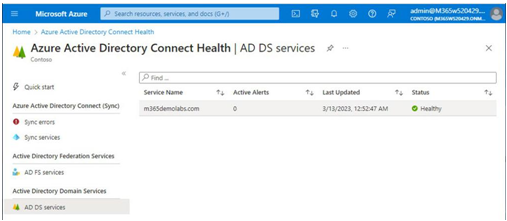
                  From the Azure AD Connect Health page, under Active Directory Domain Services, select AD DS services, as shown in Figure 4.19, and then select a domain to view its details:

                  Figure 4.19 – Azure AD Connect Health AD DS services

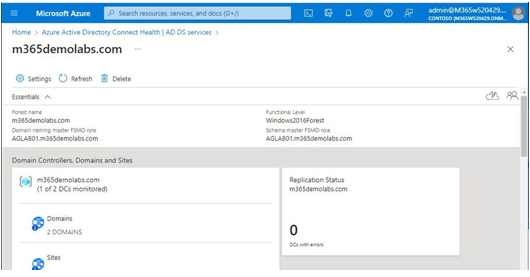
                  The health services agents display a variety of details about the environment, including replication errors, LDAP bind operations, NTLM authentication operations, and Kerberos authentication operations. See Figure 4.20:

                  Figure 4.20 – Azure AD Connect Health for DS detail page

                  Errors that are detected here should be resolved in your on-premises AD environment.

                  Installing the Provisioning Agent– Implementing and Managing Identity Synchronization with Azure AD

                  Before you begin the installation, you should make sure that the server where the provisioning agent will be installed can communicate with the various Azure AD services. Table 4.3 highlights ports and URLs that are required for the cloud sync agent to function correctly:

                  EndpointPort/ProtocolDescription 
                      
                  *.msappproxy.net443/HTTPSAzure Application Proxy cloud 
                  *.servicebus.windows.net service endpoints 
                     
                      
                  crl3.digicert.com80/HTTPCertificate Revocation List 
                  crl4.digicert.com (CRL) endpoints 
                     
                  ocsp.digicert.com   
                  crl.microsoft.com   
                  oneocsp.microsoft.com   
                  ocsp.msocsp.com   
                      
                  EndpointPort/ProtocolDescription
                     
                  login.windows.net443/HTTPSAgent configuration and registration
                  secure.aadcdn.  
                  microsoftonline-p.com  
                  *.microsoftonline.com  
                  *.microsoftonline-p.com  
                  *.msauth.net  
                  *.msauthimages.net  
                  *.msecnd.net  
                  *.msftauth.net  
                  *.msftauthimages.net  
                  *.phonefactor.net  
                  enterpriseregistration.  
                  windows.net  
                  management.azure.com  
                  policykeyservice.dc.ad.  
                  msft.net  
                  ctldl.windowsupdate.com  
                  www.microsoft.com/pkiops  
                     
                  ctldl.windowsupdate.com80/HTTPAgent configuration and registration
                     

                  Table 4.3 – Required endpoints for Azure AD Connect Cloud Sync service

                  To begin configuring Azure AD Connect Cloud Sync, follow these steps:

                  1.Log on to a server where you wish to install the Azure AD Connect Cloud Sync provisioning agent.

                    2. Navigate to the Azure portal (https://portal.azure.com) and select Active Directory | Azure AD Connect.

                    Figure 4.25 – Azure AD Connect in the Azure portal

                    3. From the navigation menu, select Cloud Sync.

                    4. Under Monitor, select Agents.

                    5. Select Download on-premises agent.

                    Figure 4.26 – Download on-premises agent for Azure AD Connect Cloud Sync

                    6. On the Azure AD Provisioning Agent flyout, select Accept terms & download to begin the download.

                    7. Open the AADConnectProvisioningAgentSetup.exe file to begin the installation.

                    8. Agree to the licensing terms and click Install to deploy the Microsoft Azure AD Connect provisioning package.

                    9. After the software installation is complete, the configuration wizard will launch. Click Next on the splash page to begin the configuration.

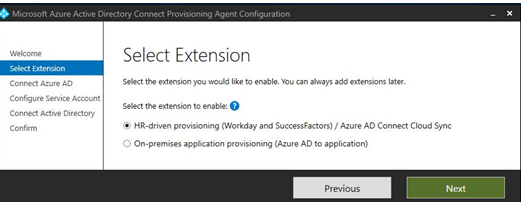
                    10. On the Select Extension page, choose the HR-driven provisioning (Workday and SuccessFactors) / Azure AD Connect Cloud Sync radio button and click Next. See Figure 4.27:

                      Figure 4.27 – Azure AD Connect Cloud Sync Select Extension page

                      11. On the Connect Azure AD page, click Authenticate to sign in to Azure AD.

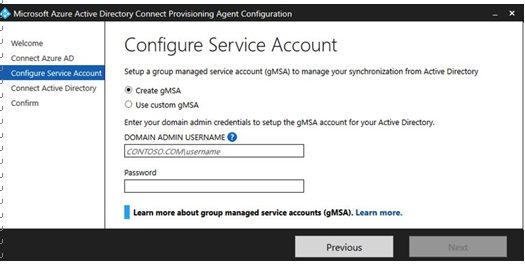
                      12. On the Configure Service Account page, select the Create gMSA radio button to instruct the setup process to provision a new gMSA. Enter either Domain Admin or Enterprise Admin credentials and click Next. See Figure 4.28:

                        Figure 4.28 – Configure Azure AD Connect Cloud Sync service account

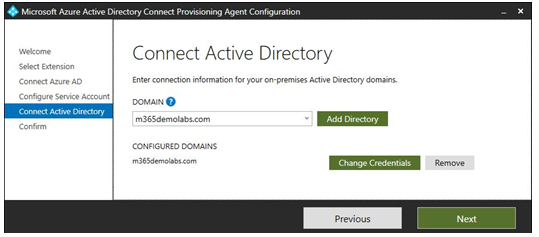
                        13. On the Connect Active Directory page, click Add Directory and provide the domain credentials to add the directory to the configuration. When finished, click Next. See Figure 4.29:

                          Figure 4.29 – Adding a directory to Azure AD Connect Cloud Sync

                          14. Review the details on the Agent configuration page and click Confirm to deploy the provisioning agent. When finished, click Exit.

                            After the agent has been deployed, you will need to continue the configuration in the Azure AD portal.