Another customization option available involves mapping attribute values between on-premises and cloud objects. As with Azure AD Connect, you can configure how cloud attributes are populated—whether it’s from a source attribute, a constant value, or some sort of expression.
Azure AD Connect sync comes with a default attribute mapping flow, as shown in Figure 4.33:
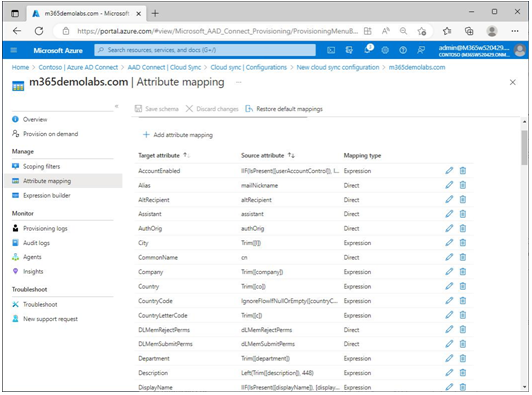
Figure 4.33 – Azure AD Connect Cloud Sync attribute mappings
You can select an existing attribute to modify or create a new attribute flow. One of the basic configuration features for most attributes is to configure a Default value (if the on-premises value is blank), allowing you to make certain that cloud attributes are populated with values.
In Figure 4.34, the Country attribute has been selected and updated with the default value US. This ensures that in the event a user’s on-premises country attribute is blank, the corresponding cloud attribute will be populated with a valid entry.
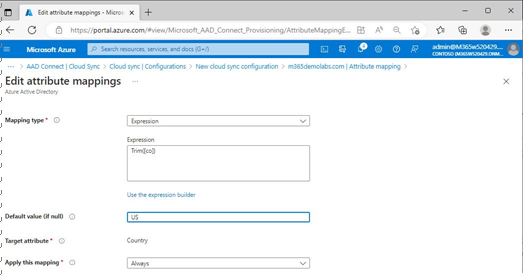
Figure 4.34 – Edit attribute mappings in Azure AD Connect Cloud Sync
Azure AD Connect Cloud Sync also features an expression builder, allowing you to create your own custom attribute flows.
Unlike Azure AD Connect, however, attribute mappings and expressions cannot be used to merge attributes from different domains or forests, nor does Azure AD Connect Cloud Sync support synchronization rules or attribute flow precedence. If you require that level of customization, you should deploy Azure AD Connect instead.
Once you have finished customizing the scoping filters and attribute flows, you can return to the Overview page and enable synchronization by selecting Review and enable.
Troubleshooting Azure AD Connect Cloud Sync Synchronization
Just as Azure AD Connect may experience issues with synchronizing identity, Azure AD Connect Cloud Sync can as well. Successful synchronization depends on several factors:
- Agent functionality: Is the agent installed and functioning normally?
- Network communications: Can the agent reach all of the required endpoints and resolve DNS for Azure AD services?
- Service account issues: Does the service account have the appropriate rights to the on-premises objects?
When troubleshooting the Azure AD Connect Cloud Sync service, you should start with the Windows Event Viewer to determine whether there are any errors related to the service, such as invalid credentials or missing privileges.
While Microsoft generally recommends bypassing proxy and content filtering services for Microsoft 365 endpoints, your organization may still choose to deploy them. In the event that the server for the Azure AD Connect Cloud Sync agent is located behind a proxy server or appliance, it may become necessary to modify the service configuration file with the proxy’s information.
The Azure AD Connect Cloud Sync provisioning agent utilizes a configuration file stored in
C:\Program Files\Microsoft Azure AD Connect Provisioning Agent\ AADConnectProvisioningAgent.exe.config. To add proxy configuration information, edit this file, and before the closing </configuration> tag, enter the following data (replacing
[proxy-server] and [proxy-port]) with the proxy server or appliance address and network port:
<system.net><defaultProxyenabled=”true”useDefaultCredentials=”true”><proxyusesystemdefault=”true”proxyaddress=”http://[proxy-server]:[proxy-port]”bypassonlocal=”true”/></defaultProxy></system.net>
If you need to perform deeper troubleshooting for the agent, you can install the AADCloudSyncTools PowerShell module. The AADCloudSyncTools module has a number of functions in it for configuringand gathering verbose logging data, configuring the sync schedule, and repairing the service account. For more information on the functions supported by the cmdlet, see https://learn.microsoft.com/ en-us/azure/active-directory/hybrid/cloud-sync/reference-powershell.
Leave a Reply