Archives 2024

Summary– Implementing and Managing Authentication

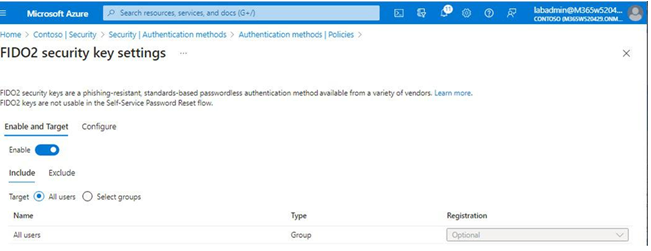
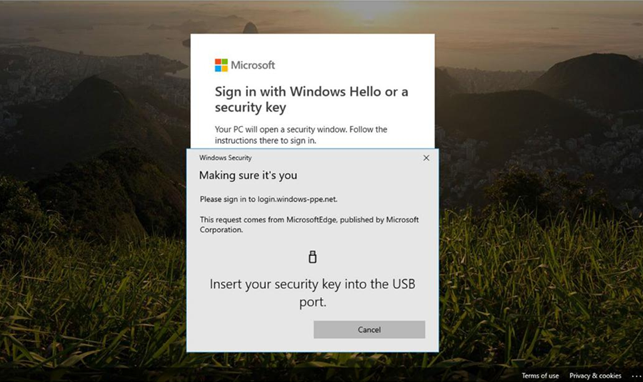
In this chapter, you learned how to evaluate passwordless sign-in options for your organization and deploy the ones that best suit your needs. Some passwordless options, such as Windows Hello or FIDO2 keys, may require specialized hardware such as cameras, USB devices, or fingerprint readers, while the Microsoft Authenticator app method requires only the Microsoft Authenticator app on any supported Android or iOS-based device.

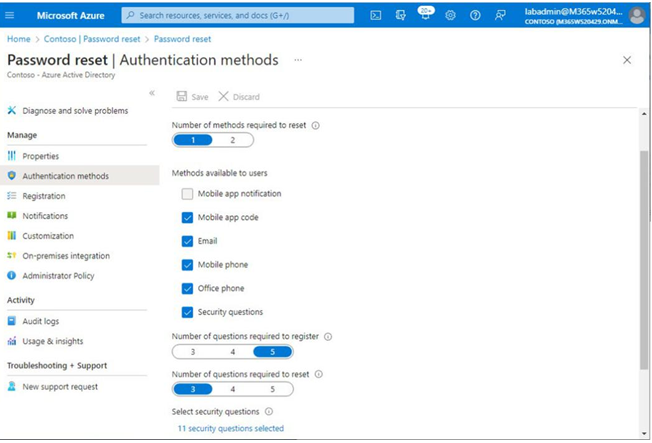
You also learned about deploying features such as self-service password reset and Azure AD password protection to further reduce administrative overhead, helping your organization comply with security policies.

In the next chapter, you’ll learn about implementing secure access in the context of Microsoft 365.

Exam Readiness Drill – Chapter Review Questions Benchmark Score: 75%

Apart from a solid understanding of key concepts, being able to think quickly under time pressure is a skill that will help you ace your certification exam. That’s why, working on these skills early on in your learning journey is key.

Chapter review questions are designed to improve your test-taking skills progressively with each chapter you learn and review your understanding of key concepts in the chapter at the same time. You’ll find these at the end of each chapter.

Before You Proceed

You need to unlock these resources before you start using them. Unlocking takes less than 10 minutes, can be done from any device, and needs to be done only once. Head over to the start of Chapter 7, Managing Security Reports and Alerts by Using the Microsoft 365 Defender Portal in this book for instructions on how to unlock them.

To open the Chapter Review Questions for this chapter, click the following link:

https://packt.link/MS102E1_Ch05. Or, you can scan the following QR code:

Figure 5.34 – QR code that opens Chapter Review Questions for logged-in users

Once you login, you’ll see a page similar to what is shown in Figure 5.35:

Figure 5.35 – Chapter Review Questions for Chapter 5

Once ready, start the following practice drills, re-attempting the quiz multiple times:

Exam Readiness Drill
For the first 3 attempts, don’t worry about the time limit.

ATTEMPT 1
The first time, aim for at least 40%. Look at the answers you got wrong and read the relevant sections in the chapter again to fix your learning gaps.

ATTEMPT 2
The second time, aim for at least 60%. Look at the answers you got wrong and read the relevant sections in the chapter again to fix any remaining learning gaps.

ATTEMPT 3 The third time, aim for at least 75%. Once you score 75% or more, you start working on your timing.

Tip You may take more than 3 attempts to reach 75%. That’s okay. Just review the relevant sections in the chapter till you get there.

Working On Timing

Target: Your aim is to keep the score the same while trying to answer these questions as quickly as possible. Here’s an example of how your next attempts should look like:

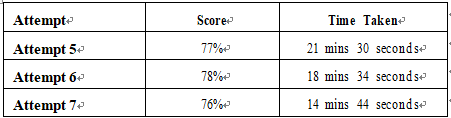
Table 5.4 – Sample timing practice drills on the online platform

Note
The time limits shown in the above table are just examples. Set your own time limits with each attempt based on the time limit of the quiz on the website.

With each new attempt, your score should stay above 75% while your time taken to complete should decrease. Repeat as many attempts as you want till you feel confident dealing with the time pressure.

Additional Multifactor Authentication Behavior Settings– Implementing and Managing Authentication

In addition to the core options for the methods and types of multifactor authentication, Azure AD also supports a number of settings, as given in Table 5.3, to further modify the behavior of multifactor authentication. These properties are located under Azure Active Directory | Security | Multi-Factor authentication in the Azure portal:

Table 5.3 – Additional multifactor authentication settings

Investigating and Resolving Authentication Issues

Resolving authentication issues in Azure AD can be tricky due to the number of authentication methods, sign-in methods, and other configurations that may be put in place.

The first step when attempting to troubleshoot an issue is to review any available sign-in logs in the Azure portal. To locate the sign-in logs, navigate to the Azure portal (https://portal.azure. com) and then select Azure Active Directory | Sign-in logs. See Figure 5.30:

Figure 5.30 – Sign-in logs

Each authentication failure generates an individual entry. You can select an entry to see expanded details, as shown in Figure 5.31:

Figure 5.31 – Activity details

The Basic info tab displays high-level information about this particular event. The critical piece of information will typically be listed next to Failure reason, and some expanded explanation may be available in the Additional Details property. In the example shown in Figure 5.31, the reason for the failure of authentication is that the user entered an incorrect password. If the user has entered an incorrect password multiple times in a row, it may be a sign of a forgotten password or an attempted identity breach. Figure 5.32 shows the same account after it has met the smart lockout threshold:

Figure 5.32 – Sign-in detail showing locked-out account

The Location tab will show detailed information regarding the source IP address, and, if possible, resolution to a particular geographic location.

The Device info tab displays information regarding the device that was attempting a logon, such as a Windows 10 device with the Edge browser.

Note
Other browsers can also provide device information or interact with the Microsoft 365 logon process if they have the Windows Accounts extension installed. For example, Chromium-based browsers can install the Windows Accounts extension from the Chrome Web store: https://chromewebstore.google.com/detail/windows-accounts/ ppnbnpeolgkicgegkbkbjmhlideopiji.

The Authentication Details tab, shown in Figure 5.33, provides additional information regarding the authentication method, including whether the user is configured for Password Hash Sync, Federation, or Pass-through Authentication, or whether they’re using a cloud-managed identity:

Figure 5.33 – Authentication details

Finally, the last two tabs, Conditional Access and Report-only, show what policies took effect during the sign-in process. You can review these tabs for the status of Conditional Access policies, showing either what was applied or would have been applied during the logon process and how any conditions were satisfied.

Resolving an authentication issue sometimes requires examining several logs to determine the source of the error. In many cases, however, the detailed data provided on each of the tabs of an event’s activity details should provide adequate information to pinpoint the source of the error.

Security Defaults– Implementing and Managing Authentication

For most organizations, security defaults are a good choice for configuring broad baseline security policies. Security defaults make the following security changes:

• Requiring all users to register for multifactor authentication
• Requiring administrators to perform multifactor authentication upon sign-in
• Requiring users to do multifactor authentication when necessary
• Blocking basic authentication and other legacy authentication protocols
• Requiring administrators to perform multifactor authentication when accessing privileged resources, such as the Azure portal, Azure PowerShell, or the Azure CLI

Security defaults can be modified by users with the Global Administrator, Conditional Access administrator, or Security administrator roles. Security defaults can be enabled or disabled using the following process:

  1. Navigate to the Azure portal (https://portal.azure.com).
  2. Select Azure Active Directory.
  3. Under Manage, click Properties.
  4. Scroll to the bottom of the page and click Manage security defaults.
  5. On the Security defaults flyout, select either Enabled or Disabled and click Save.

If you are going to configure Conditional Access policies, you should disable security defaults. If you are not going to configure Conditional Access policies, you should enable security defaults.

Further Reading
For more information on the impact of security defaults, see https://learn. microsoft.com/en-us/azure/active-directory/fundamentals/ concept-fundamentals-security-defaults.

Conditional Access

Conditional Access provides the most fine-grained control when managing the multifactor authentication requirements for your organization. Conditional Access policies can be configured from the Azure portal.

To access the Conditional Access configuration page, follow these steps:

  1. Navigate to the Azure portal (https://portal.azure.com).
  2. Select Azure Active Directory | Security | Conditional Access, and then choose Policies.

You can create new policies or use one of the Microsoft-provided 14 sample Conditional Access policy templates. Policies created with a template can be modified once they have been deployed to your tenant.

To configure a template-based policy, follow these steps:

  1. From the Conditional Access | Policies page, as shown in Figure 5.28, select New policy from template (Preview):

Figure 5.28 – Creating a new Conditional Access policy from a template

  1. Select one of the templates, such as Require multifactor authentication for all users, and click Review + create, as shown in Figure 5.29:

Figure 5.29 – Selecting a template

  1. Review the settings and click Create.

Policies created through the templates cannot be modified during creation, with the exception of Enforcement mode. All template-based policies are configured in Report only mode, which can be toggled during creation. The user creating the policy is excluded from the policy to prevent accidental lockout.

After the template policies have been configured, you can edit the scope and conditions for the policy like manually created policies.

Further Reading

For more information on Conditional Access templates, see https://learn.microsoft. com/en-us/azure/active-directory/conditional-access/concept-conditional-access-policy-common.

With the exception of Windows Hello, passwordless sign-in methods (such as the Microsoft Authenticator app or FIDO2 security keys) will require users to register for multifactor authentication.

Password protection for Windows Server Active Directory– Implementing and Managing Authentication

This settings area allows you to extend the custom banned password list to your on-premises infrastructure. There are two components:

• Azure AD Password Protection DC agent, which must be installed on domain controllers.
• Azure AD Password Protection proxy, which must be installed on at least one domain-joined server in the forest. As a security best practice, Microsoft recommends deploying it on a member server since it requires internet connectivity.

In this configuration, the Azure AD Password Protection proxy servers periodically retrieve the custom banned password list from Azure AD. The DC agents cache the password policy locally and validate password change requests accordingly.

If Enable password protection on Windows Server Active Directory is configured as Yes, then you can choose what mode to process password change requests. They can be processed in Audit mode (where changes or logged) or Enforced mode, where password resets are actively evaluated against the banned password list and rejected if they do not meet the requirements.

Further Reading

To view detailed steps for deploying password protection on-premises, see https://learn. microsoft.com/en-us/azure/active-directory/authentication/ concept-password-ban-bad-on-premises.

Configuring and Managing Multifactor Authentication

Configuring users for multifactor authentication can increase the security posture of your Microsoft 365 environment, in addition to protecting any apps that use Azure AD for identity and authentication. In this section, you’ll look at configuring multifactor authentication for your tenant.

Per-User Multifactor Authentication

If multifactor authentication was configured in your tenant prior to October 2019, it may have been configured using the legacy multifactor authentication scheme. Prior to newer technologies, Legacy
Azure MFA was enabled on a per-user basis by manually updating each user’s account to enforce the use of MFA.

Prior to implementing either Microsoft-managed security defaults or Conditional Access policies, you will need to disable the legacy per-user MFA. Having per-user MFA enabled while configuring a Conditional Access policy that prompts for MFA may cause unintended or unexpected MFA prompts.

Note
You should only configure one mechanism for multifactor authentication to avoid unexpected behaviors, such as users being prompted for MFA in scenarios where they previously satisfied multifactor authentication requirements or were accessing resources from trusted locations. Microsoft recommends discontinuing the use of per-user MFA and using Conditional Access policies instead.

To disable per-user multifactor authentication, follow these steps:

  1. Navigate to the Microsoft 365 admin center (https://admin.microsoft.com).
  2. Expand Users and select Active users.
  3. Select Multi-factor authentication:

Figure 5.26 – Active users page

  1. If your tenant already has Conditional Access policies, you may need to select the Legacy per-user MFA link to launch the legacy multi-factor authentication page.
  2. On the multi-factor authentication page, as shown in Figure 5.27, configure the per-user MFA status to Disabled for users that have Enforced or Enabled set. You can select multiple users, but can only multi-select users that have the same MFA status type:

Figure 5.27 – Selecting users

Once per-user MFA is disabled, you can configure security defaults or Conditional Access policies.

On-premises integration– Implementing and Managing Authentication

If you have configured Azure AD Connect or Azure AD Connect Cloud sync with your organization, you can manage SSPR integration features, as shown in Figure 5.23:

Figure 5.23 – On-premises integration

It’s important to note that the Enable password write back for synced users option only modifies the behavior of Azure AD sending password reset data back to the on-premises environment, effectively stopping on-premises integration. It does not modify the on-premises Azure AD Connect configuration.

Next, you’ll look at the features of Azure AD password protection.

Implementing and Managing Azure AD Password Protection

Azure AD password protection is a set of features designed to limit the effects of common password attacks. To view the password protection configuration, navigate to Azure Active Directory | Security | Authentication methods and select Password protection. See Figure 5.24:

Figure 5.24 – Password protection

There are three groups of settings to configure:

• Custom smart lockout
• Custom banned passwords
• Password protection for Windows Server Active Directory

Let’s briefly examine each set of configurations.

Custom smart lockout

The smart lockout settings determine how Azure Active Directory handles failed login attempts. Lockout threshold is the number of times in a row a user can enter a bad password before getting locked out. By default, Lockout threshold is set to 10 in Azure Worldwide (sometimes referred to as Commercial or Public) and Azure China 21Vianet tenants, while it is set at 3 for Azure US for Government customers. Figure 5.25 depicts the error message displayed when the bad password threshold is met:

Figure 5.25 – Account lockout

Lockout duration in seconds only specifies the initial lockout duration after the lockout threshold has been reached. Each subsequent lockout increases the lockout duration. As a security mechanism, Microsoft does not publish the rate at which the duration increases.

Custom banned passwords
While Microsoft recommends moving toward passwordless authentication as a primary mechanism, passwords are still required to be configured in a number of scenarios. To help minimize using well-known, weak, or easily guessable passwords, you can choose to specify a custom list of words that you want to exclude from being used as passwords. For example, you may wish to include your organization’s name or abbreviation, products or services offered by your organization, or local sports teams.

To enable the option, slide the Enforce custom list toggle to Yes, and then add up to 1,000 banned words in the Custom banned password list text area. The list is not case-sensitive. Azure AD automatically performs common substitutions (such as 0 and o or 3 and e), so you do not need to think of all of the possible ways a word can be represented.

Configuring SSPR– Implementing and Managing Authentication

Enabling SSPR is a straightforward task. Like many other features in Azure AD, it can be scoped to a group of users.

To enable SSPR, follow these steps:

  1. Navigate to the Azure portal (https://portal.azure.com) and select Azure Active Directory.
  2. Under Manage, select Password reset.
  3. On the Properties page, as shown in Figure 5.21, click Selected if you want to be able to select one or more groups to enable SSPR. Click All if you want to enable all users for SSPR:

Figure 5.21 – Enabling self-service password reset

  1. Click Save.

Now that SSPR has been enabled, you can manage and configure the features.

Managing SSPR

The SSPR service has a number of configuration options, including Authentication methods, Registration settings, Notifications options, Customization portal, and On-premises integration.
Each of those options can be configured on the Password reset configuration blade of the Azure portal.

Authentication Methods
Authentication methods are used to define how a user proves their identity, such as multifactor authentication or answering security questions. The Authentication methods page lets you select which options a user can register, as well as the number of methods needed to perform a reset. See Figure 5.22:

Figure 5.22 – Authentication methods

If you choose Security questions, additional options are configurable:

• The number of questions a user must supply when they select that option
• The number of security questions they must answer to prove their identity

You can choose up to 20 security questions from a list of predefined options or create your own security questions. Administrators are unable to pre-populate or retrieve answers to end user security
questions; users must select their own questions.

Exam Tip
Using the Office phone registration option requires an Azure AD Premium license (either P1 or P2) and can be pre-populated with a phone number in Active Directory under the telephoneNumber attribute (if using Azure AD Connect to synchronize data). Other fields that can be pre-populated for SSPR include a user’s alternate email address and mobile phone number. Alternate email does not synchronize from the on-premises Active Directory and must be set using Set-AzureADUser -OtherMails, Set-MsolUser -AlternateEmailAddresses, or Set-MgUser -OtherMails.

Registration
Options on this page allow you to configure a workflow to force users to register for SSPR the first time they log in to the Microsoft 365 portal (or any other Azure AD-backed service), as well as the interval in days in which users are asked to reconfirm their details.

Notifications
The Notifications page allows you to configure options for alerting on password changes. You can select Notify users on password resets, which sends users an email when their own password is reset via SSPR. The Notify all admins when other admins reset their password setting determines whether all Global Administrators receive a notification when any Global Administrator resets their password via SSPR.

Note
SSPR can be disabled on a per-user basis. In addition, SSPR can be disabled for administrator accounts using the Update-MgPolicyAuthorizationPolicy cmdlet. For more information, see https://learn.microsoft.com/en-us/ powershell/module/microsoft.graph.identity.signins/update-mgpolicyauthorizationpolicy.

Customization
The Customization page allows you to display a custom URL or email address for support-related requests.

Configuring the Authentication Policy– Implementing and Managing Authentication

To enable users to sign in with FIDO2 security keys, you need to configure the authentication policy. Configuring the policy requires an account with the Global Administrator or Authentication Administrator role:

  1. Navigate to the Azure portal (https://portal.azure.com).
  2. Select Azure Active Directory | Security | Authentication methods and then select Policies.
  3. Select Microsoft Authenticator.
  4. On the Enable and Target tab of the FIDO2 security key settings page, slide the Enable toggle to On. See Figure 5.18:

Figure 5.18 – Enabling Microsoft Authenticator

  1. Using the Include and Exclude tabs, specify which users the policy settings will apply to. Select the All users radio button to include all users in the policy or choose the Select groups radio button to specify which groups will be included or excluded.
  2. Click Save to update the policy configuration.

The next step is to instruct users to register the security keys.

Registering Devices

Like Microsoft Authenticator-based authentication, FIDO2 authentication requires end users to register the compatible device they wish to use for authentication.

Note
In order to register a FIDO2 security key, the user must already have an Azure AD multifactor authentication method configured. If they do not have one, they must add one (such as Microsoft Authenticator or SMS). If that is not possible, an administrator can issue a Temporary Access Pass (TAP) to allow the user to complete registration. For more information on configuring a TAP, please see https://learn.microsoft.com/en-us/azure/active-directory/ authentication/howto-authentication-temporary-access-pass.

To register a FIDO2 security key, users must follow these steps:

  1. Navigate to https://myprofile.microsoft.com or, from the Microsoft 365 portal, expand the profile icon and select View account:

Figure 5.19 – Accessing My account

  1. Click Security Info.
  2. Select Add method and click Security key.
  3. Select either USB device or NFC device.
  4. Ensure the key is ready and click Next.
  5. In the dialog box, create and enter a PIN for the security key and then perform the required gesture (biometric/touch) to confirm.
  6. Enter a Name value for the key and click Next.
  7. Click Done.

After the key has been registered, users can sign in to Azure AD, Entra ID, or Microsoft 365 using their security key. At the sign-in page, after entering a username, users can select the Use Windows Hello or a security key option, which will cause the browser to issue a prompt to insert the key, as shown in Figure 5.20:

Figure 5.20 – Sign in with Windows Hello or a security key

Next, you’ll look at configuring a self-service password reset.

Implementing and Managing Self-Service Password Reset

Self-service password reset (SSPR) is a feature that allows users to change or reset passwords without administrator or service desk involvement. Self-service passwords can be configured for Azure AD cloud-only environments as well as enabling SSPR of hybrid identity through the Azure AD Connect Password Writeback feature.