Archives 2023

Configuring the Authentication Policy– Implementing and Managing Authentication

To enable users to sign in with Microsoft Authenticator, you need to configure the authentication policy. The authentication policy is shared across the tenant, though different authentication methods are scoped for groups of users.

Configuring and managing the policy requires an account with the Global Administrator or Authentication Administrator role:

  1. Navigate to the Azure portal (https://portal.azure.com).

Exam Tip

While the current (as of this writing) version of the exam was developed before full parity of the Entra admin center was delivered, it’s important to understand that interim exam updates may include references to the Entra admin center (https://entra.microsoft.com). Things such as menu items or configuration options are located in slightly different locations (from the left-hand menu navigation perspective), though they render the current Azure portal information in the main content window.

2. Select Azure Active Directory | Security | Authentication methods and then select Policies, as shown in Figure 5.10:

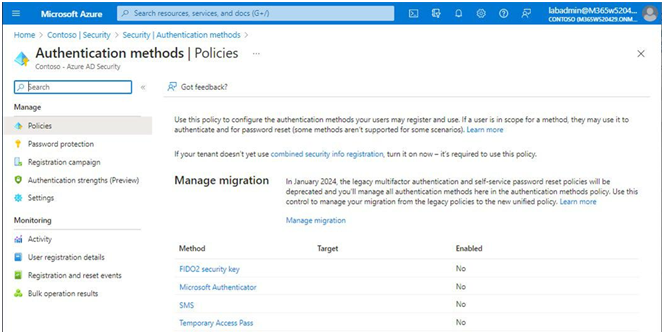
Figure 5.10 – Authentication methods

3. Select Microsoft  Authenticator.

4.    On the Enable and Target tab of the Microsoft Authenticator settingspage, slide the Enable toggle to On, as shown in Figure 5.11:

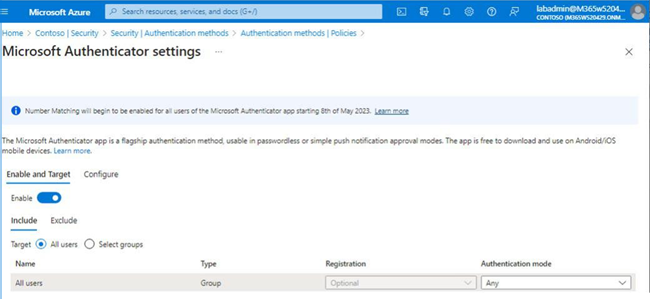
Figure 5.11 – Enabling Microsoft Authenticator

5. Using the Include and Exclude tabs, specify which users the policy settings will apply to. Select the All users radio button to include all users in the policy or choose the Select groups radio button to specify which groups will be included or excluded. Each group can have a separate Authentication mode value selected, including Any (default), Passwordless, or Push. Choosing Push as the option prevents the use of the passwordless phone sign-in credential.

6. Click Save to update the policy configuration.

After configuring the policy, users will need to register any devices to be used for passwordless authentication.

Registering Devices

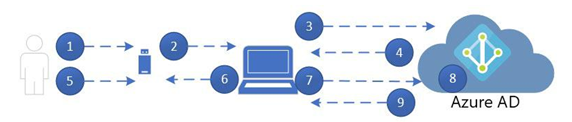
Before users can log in to the service using Microsoft Authenticator, they will need to register their devices. If they’ve already registered for multifactor authentication, nothing else needs to be done.

If a user who has not registered signs in to the Microsoft 365 portal, they are greeted with aMore information required dialog as part of the sign-in process, as shown in Figure 5.12:

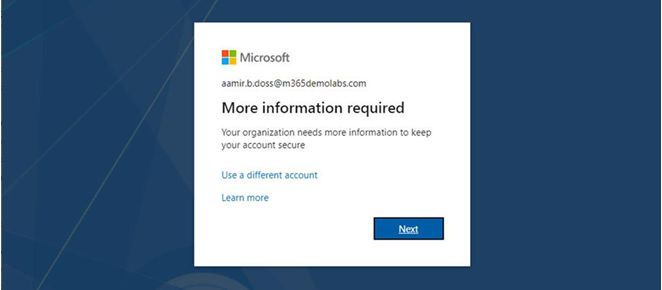
Figure 5.12 – More information required

During the process, they are redirected to download the Microsoft  Authenticator app, as shown in

Figure 5.13:

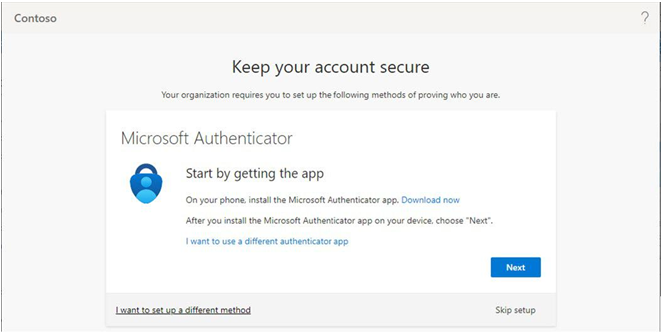
Figure 5.13 – Keep your account secure page

After they click Next, they are prompted to launch the Microsoft Authenticator app and add an account. Following the directions on the mobile device, they should launch a camera window that allows them to take a picture of a unique QR code, linking their device to their account, as shown in Figure 5.14:

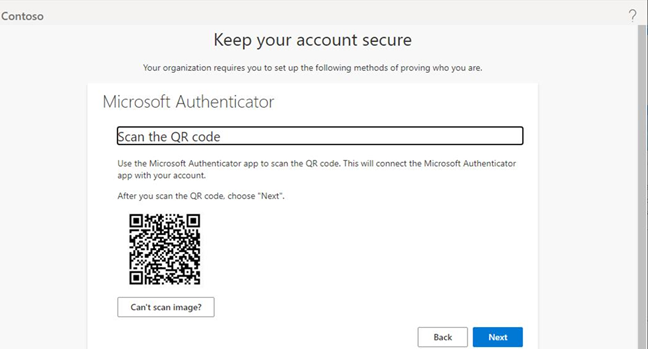
Figure 5.14 – Registering a device

Once the device has been linked, the enrollment process will ask the user to confirm a code between the registration screen and their Microsoft Authenticator app. After completing the challenge, users should be presented with a confirmation screen, similar to the one shown in Figure 5.15:

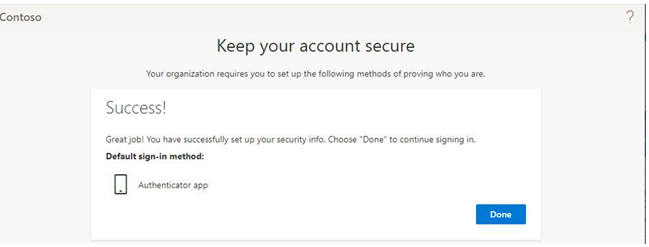
Figure 5.15 – Authenticator registration screen

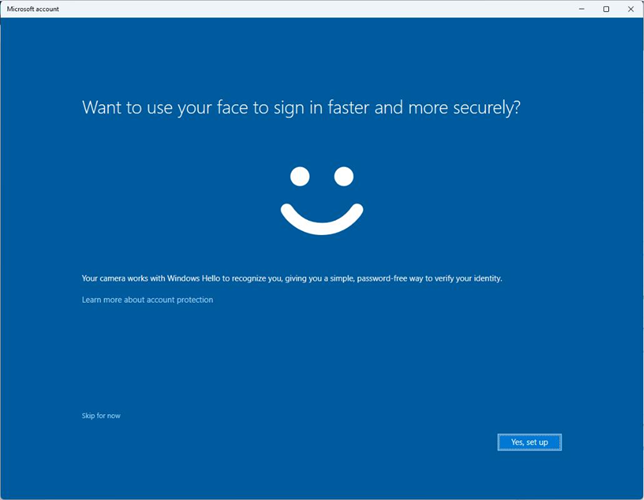
The final step for the user for full passwordless sign-in from the Microsoft Authenticator app is to configure the device itself. In Microsoft Authenticator, the user can open the app and select Enable phone sign-in, as shown in Figure 5.16:

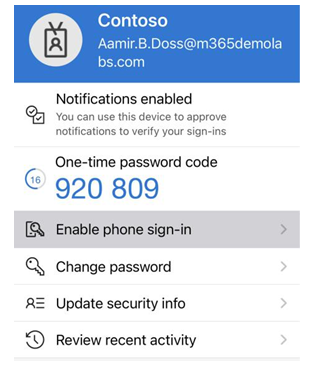
Figure 5.16 – Microsoft Authenticator Enable phone sign-in

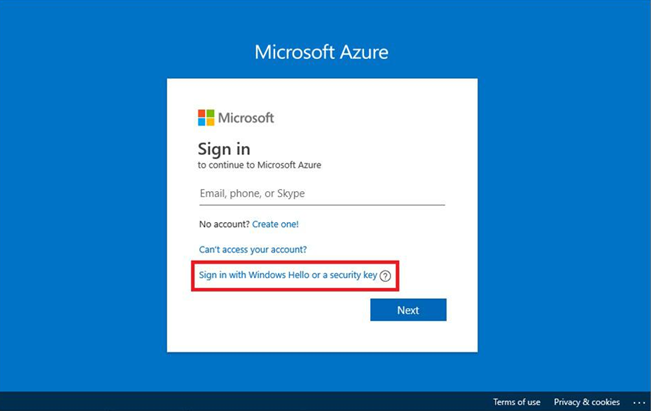
This will start a process to configure the device for passwordless sign-in. After configuration, the user can choose to log in with an app instead, triggering the phone authentication notification on their device. See Figure 5.17:

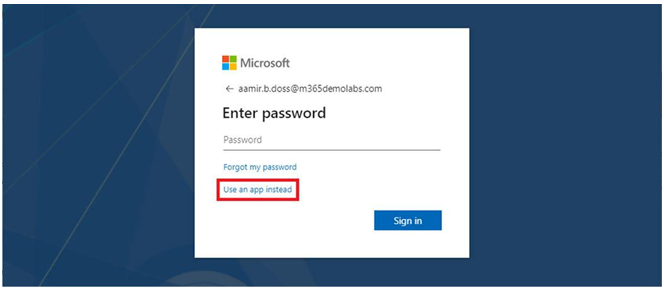
Figure 5.17 – Launching passwordless sign-in

The user then completes the logon challenge in the Microsoft Authenticator app to finish logging in to Microsoft 365.
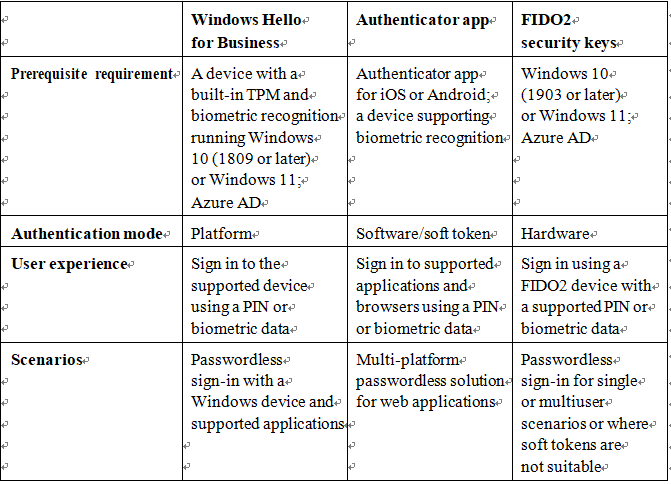
Configuring FIDO2

When setting up FIDO2 -based authentication, you’ll follow a similar process as with Microsoft Authenticator—updating the authentication policy to allow the method and then instructing users to self-register their security keys.

Configuring Windows Hello– Implementing and Managing Authentication

WHFB supports cloud-only, hybrid Azure AD, and on- premises deployments. The easiest method to deploy Windows Hello is in a cloud-only model since the Microsoft 365 organization is set up for it automatically. You’ll look at that scenario in this section.

During the out-of-box experience (OOBE), users are prompted for credentials. After providing an Azure AD credential, if the Intune enrollment policy has not been configured to block WHFB, the user will be prompted to enroll with their biometric data (such as a facial scan with a compatible camera) and set a PIN.

Devices will be joined to Azure AD during the initial sign-in process and WHFB will be enabled.

If your subscription supports it, Microsoft recommends creating a WHFB policy to configure settings for your organization:

1.Navigate to the Intune admin center (https://intune.microsoft.com or https://endpoint.microsoft.com).

    2. Expand Devices and, under Device enrollment, select Enroll devices, as shown in Figure 5.7:

    Figure 5.7 – Enroll devices

    3. Select Windows enrollment and then choose Windows Hello for Business, as shown in Figure 5.8:

    Figure 5.8 – Windows Hello for Business

    4. Under Assigned to, select a group (if scoping the enrollment policy to a subset of users).

    5. Configure the options for Windows Hello for Business (italics options are the default settings for the enrollment policy):

    • Configure Windows Hello for Business: Enabled, Disabled, Not Configured
    • Use a Trusted Platform Module (TPM): Required, Preferred
    • Minimum PIN length: Configure a numeric value between 4 and 127.
    • Maximum PIN length: Configure a numeric value between 4 and 127.
    • Lowercase letters in PIN: Not allowed, Allowed, Required
    • Uppercase letters in PIN: Not allowed, Allowed, Required
    • Special characters in PIN: Not allowed, Allowed, Required
    • PIN expiration (days): Never, a numeric value between 1 and 730
    • Remember PIN history: Never, a numeric value between 1 and 50
    • Allow biometric authentication: Yes, No
    • Use enhanced anti-spoofing, when available: Not configured, Yes, No
    • Allow phone sign-in: Yes, No
    • Use security keys for sign-in: Not configured, Enabled, Disabled

    6. Click Save to update the enrollment policy.

    With the policy configured, new device enrollments (for the configured user group) will receive the Windows Hello for Business setup prompt to begin enrollment, as shown in Figure 5.9:

    Figure 5.9 – Windows Hello for Business enrollment

    After completing enrollment, users will be able to unlock and log in to devices using supported biometrics or their PIN.

    Users that are already connected to Azure AD can also trigger the Windows Hello setup wizard, by either navigating to the Account protection blade in the Windows Settings app or by pressing Win+R and entering ms-cxh://nthaad in the Run dialog box.

    Next, you’ll look at configuring Microsoft  Authenticator for passwordless sign-in.

    Configuring Microsoft Authenticator

    The Microsoft Authenticator app provides a convenient way to sign in to any Azure AD account with a supported mobile device. Before users can sign in using the method, however, it will need to be enabled in your tenant through the authentication policy.

    FIDO2 Security Keys– Implementing and Managing Authentication

    Physical tokens, such as the Fast Identity Online 2 (FIDO2)-based token or security key, are another passwordless option that can be used. While the Microsoft Authenticator app is a soft token, FIDO2 tokens are physical pieces of hardware that are typically either connected to the computer (in the form of a USB device) or that communicate wirelessly (via Bluetooth or NFC).

    You can access the security key logon process during a browser session by selecting the Sign in with

    Windows Hello or a security key option from the sign-in page, as shown in Figure 5.5:

    Figure 5.5 – Passwordless authentication dialog with a FIDO2 security token

    The data flow for a FIDO2-based logon follows a similar pattern as both WHFB and the Microsoft Authenticator app. For example, to log in to a device using FIDO2, this process outlined in Figure 5.6 is followed:

    Figure 5.6 – FIDO2 authentication sequence

    1. The user plugs in a FIDO2 security key.
    2. Windows detects the security key.
    3. Windows sends an authentication request to Azure AD.
    4. Azure AD responds by sending a nonce back to the logon device.
    5. The user authenticates to the FIDO2 key, unlocking the secure storage area containing the private key.
    6. The FIDO2 key signs the nonce with the private key and sends it to Windows.
    7. Windows generates a PRT request and sends it with the signed nonce to Azure AD.
    8. Azure AD verifies the signed nonce with the FIDO2 device’s public key.
    9. Azure AD returns the PRT to the logon device.

    FIDO2, like Windows Hello, has specific requirements for supported hardware.

    Supported FIDO2 Security Tokens

    You can see an up-to-date list of supported FIDO2 security keys or tokens here: https:// learn.microsoft.com/en-us/azure/active-directory/authentication/ concept-authentication-passwordless#fido2-security-key-providers.

    As you’ve seen from the diagrams, each of the passwordless options (Windows Hello, Microsoft Authenticator App, and FIDO2) follows a similar authentication workflow, based on public key infrastructure.

    Comparison

    Now that you have explored the different passwordless options available for Microsoft 365, let’s look at some information that will help you choose the appropriate solution. Table 5.1 describes some basic features and requirements for each authentication scheme.

    Table 5.1 – Authentication method comparison table

    It’s also important to consider the various end user scenarios that your organization utilizes to ensure you’re recommending an appropriate mechanism based on your real-world use cases. Table 5.2 describes a few example scenarios:

    Table 5.2 – Passwordless logon scenarios

    With that information in hand, it’s time to look at the implementation aspects.

    Azure AD Connect Health for Active Directory Federation Services– Implementing and Managing Identity Synchronization with Azure AD

    In addition to gathering and reporting information for your on-premises AD and synchronization services, Azure AD Connect Health also supports AD FS.

    To get the most out of Azure AD Connect Health for AD FS, you’ll need to enable auditing, which involves three steps:

    1.Ensure the AD FS farm service account has been granted the Generate security audits right in the security policy (Local Policies | User Rights Assignment | Generate security audits).

      2. From an elevated command prompt, run the following command: auditpol.exe /set / subcategory:{0CCE9222-69AE-11D9-BED3-505054503030} /failure:enable /success:enable.

      3. On the AD FS primary farm server, open an elevated PowerShell prompt and run the following command: Set-AdfsProperties -AuditLevel Verbose.

      Then, you can deploy the agents to your servers.

      After deploying the agents to your federation and proxy servers, you will see information reported in the Azure AD Connect Health portal by selecting AD FS services under the Active Directory Federation Services section, as shown in Figure 4.21:

      Figure 4.21 – Azure AD Connect Health for AD FS

      In addition to diagnostic information, the health services for AD FS can also provide usage analytics and performance monitoring, as well as failed logins and information regarding risky sign-ins. See Figure 4.22:

      Figure 4.22 – Azure AD Connect Health for AD FS overview

      Azure AD Connect Health is a valuable premium service that can help you keep on top of the health and performance aspects of your hybrid identity deployment.

      Troubleshooting Azure AD Connect Synchronization

      While things normally operate smoothly, there may be times when objects become misconfigured, or services go offline unexpectedly. You can troubleshoot common issues with Azure AD Connect’s built-in troubleshooting tool.

      To launch the troubleshooting tool, follow these steps:

      1.Launch the Azure AD Connect configuration tool on the desktop of the server where Azure AD Connect is installed.

        2. Click Configure.

        3. On the Additional tasks page, select Troubleshoot and then click Next.

        4. On the Welcome to AADConnect Troubleshooting page, select Launch, as shown in Figure 4.23:

        Figure 4.23 – Launching the AADConnect Troubleshooting tool

        5. Select the appropriate troubleshooting option from the menu shown in Figure 4.24:

        Figure 4.24 – AADConnect Troubleshooting menu

        The AADConnect Troubleshooting tool provides several specific troubleshooters, such as diagnosing attribute or group membership synchronization, password hash synchronization, as well as service account permissions.

        Most object or attribute troubleshooting routines will require the errored object’s distinguished name to continue.

        Further Reading

        For more information on the tests that can be performed by the AADConnect Troubleshooting tool, see https://learn.microsoft.com/en-us/azure/active-directory/ hybrid/tshoot-connect-objectsync.

        Configuring and Managing Directory Synchronization by Using Azure AD Connect Cloud Sync

        Azure AD Connect Cloud Sync (rebranded as Microsoft Entra Cloud Sync) is a new synchronization platform that allows you to manage directory synchronization from the Azure portal. Depending on your organization’s goals and environments, Azure AD Connect Cloud Sync can be a lightweight, flexible option that allows you to begin directory synchronization quickly.

        Exam Tip

        To perform the installation, you’ll need either Domain Admin or Enterprise Admin credentials to the on-premises Active Directory forest so that the installer can create the group Managed Service Account (gMSA). You’ll also need an account that has either the Global Administratoror Hybrid Identity Administrator roles in Azure AD.

        Microsoft recommends configuring a unique identity in Azure AD with the Hybrid Identity Administrator role for Azure AD Connect Cloud Sync.

        Implementing and Managing Authentication Methods– Implementing and Managing Authentication

        After onboarding identity and configuring multifactor authentication requirements, you can begin deployment.

        Exam Note

        Full deployment and configuration of these methods are outside the scope of the MS-102 exam, but it would be good to spend a little bit of time reviewing the product documentation for deeper dives into how passwordless authentication works. See https://learn.microsoft. com/en-us/entra/identity/authentication/concept-authentication-passwordless for further information.

        Let’s go through an overview of the configurations necessary to enable passwordless authentication methods.

        Choosing an Authentication Mechanism

        Everyone is familiar with using an identity and a corresponding password to log in to a device, service, application, or website—whether it’s a bank website, Facebook, Xbox Live, or even just a local computer. While Microsoft 365 supports traditional username and password authentication mechanisms, there are newer methods that provide fewer opportunities for malicious users to compromise identities, applications, and devices.

        Microsoft has long advocated for using multifactor authentication as part of the logon process to help secure identities—that is, using some sort of supplementary logon tool (such as a token, authenticator app, phone call, or text message) to confirm the logon process. The weakest link in this chain is the password—and interfaces unable to leverage the multifactor authentication process are more susceptible to bad actors.

        With Microsoft’s newest passwordless technologies, users get the advantage of multifactor authentication (something you have, something you know, or something you are) without the frustration of remembering complex passwords. Microsoft supports several different approaches to passwordless logon, including Windows Hello for Business (WHFB), the Microsoft Authenticator app, and Fast Identity Online 2 (FIDO2)-compatible security keys or tokens.

        Microsoft passwordless options are based on apublic key infrastructure (PKI) design, comprising a private key (managed and stored by the user’s device) and a public key saved in Azure AD. The keys are linked and only work with each other. When an entity (be it a user or device) establishes a public/ private key pair, the public key can be broadly distributed to all other entities that the owner of the key pair wishes to communicate with.

        Each key has two purposes:

        • The public key is used to encrypt data. Only the corresponding private key can decrypt it.
        • The private key is used to sign data. Only the corresponding public key can authenticate or verify the signature, offering proof that a particular private key produced it.

        For example, let’s say you establish a public/private key pair and you wish to conduct secure email communication. You distribute the public key to everyone you will communicate with. You might even add it to your email signature, post it on a blog, or store it in a directory where others can look it up.

        The following examples demonstrate possible uses for public key cryptography in the context of email:

        • You’re sending out an important product announcement update on behalf of your organization and you want people to be certain it’s authentic. You sign the email with your private key. Recipients who already have your public key (or who can retrieve it from your website or a directory) can use the public key to check the signature on your email. Since only your private key matches that well-known public key, recipients can be assured that your private key was used to sign the content.
        • You’re in the process of acquiring financing for a new business venture. The lender has prepared documents for you to review. Since they contain sensitive financial information, the lender wants to make sure that only you can open them. They encrypt the content with your public key and email you the documents. Since only your private key is able to decrypt the content, both entities can be assured that the content will be unreadable to anyone else.

        Those types of scenarios are very analogous to what happens when using PKI-based sign-on methods such as Windows Hello—but instead of signing and encrypting email, it’s used for authentication data.

        In this section, you’ll explore a little bit about each of these mechanisms to help you decide which is appropriate for your organization.

        Attribute-Based Filtering– Implementing and Managing Identity Synchronization with Azure AD

        Another way to prevent objects from being synchronized to Azure AD is using an attribute filter. This advanced method requires creating a custom synchronization rule in the Azure AD Connect Synchronization Rules Editor.

        To create an attribute-based filtering rule, select an attribute that isn’t currently being used by your organization for another purpose. You can use this attribute as a scoping filter to exclude objects. The following procedure can be used to create a simple filtering rule:

        1.On the server running Azure AD Connect, launch the Synchronization Rules Editor.

          2. Under Direction, select Inbound and then click Add new rule. See Figure 4.11:

          Figure 4.11 – Synchronization rules editor

          3. Provide a name and description for the rule.

          4. Under Connected System, select the object that represents your on-premises Active Directory forest.

          5. Under Connected System Object Type, select user.

          6. Under Metaverse Object Type, select person.

          7. Under Link Type, select Join.

          8. In the Precedence text field, enter an unused number (such as 50) , as shown in Figure 4.12. Click Next.

          Figure 4.12 – Creating a new inbound synchronization rule

          9. On the Scoping filter page, click Add group and then click Add clause.

          10. Under Attribute, select extensionAttribute1 (or whichever unused attribute you have selected).

          11. Under Operator, select EQUAL.

          12. In the Value text field, enter NOSYNC, as shown in Figure 4.13 and then click Next.

            Figure 4.13 – Configuring a scoping filter for extensionAttribute1

            13. On the Join rules page, click Next without adding any parameters.

            14. On the Transformations page, click Add transformation.

            15. Under FlowType, select Constant.

            16. Under Target Attribute, select cloudFiltered.

            17. In the Source text field, enter the value True. Click Add.

              Figure 4.14 – Adding a transformation for the cloudFiltered attribute

              18. Acknowledge the warning that a full import and synchronization cycle will be required by clicking OK. See Figure 4.15:

                Figure 4.15 – Warning for full import and synchronization

                After modifying the synchronization rule, a full import and full synchronization is required. You don’t have to perform any special steps, however; Azure AD Connect is aware of the update and will automatically perform the necessary full imports and synchronizations.

                Monitoring Synchronization by Using Azure AD Connect Health

                Azure AD Connect Health is a premium feature of the Azure AD license. Azure AD Connect Health has separate agent features for Azure AD Connect, Azure AD Health for Directory Services (DS), and Azure AD Health for AD FS.