Since the purpose of Azure AD Connect and Azure AD Connect Cloud Sync is to synchronize user, group, contact, and device objects to Azure AD, you’ll need to make sure your objects meet the minimum requirements.
Microsoft has guidance surrounding the preparation of user objects for synchronization. Some attributes (specifically those that are used to identify the user throughout the system) must be unique throughout the organization. For example, you cannot have two users that have the same userPrincipalName value.
The following attributes should be prepared before synchronizing the directory to Azure AD:
| Attribute | Constraints | Must | Required |
| be unique | |||
| displayName | ≤ 256 characters | X | |
| givenName | ≤ 64 characters | ||
| ≤ 113 characters | X | ||
| ≤ 64 characters before the @ symbol | |||
| Adheres to the | |||
| RFC 822/2822/5322 standards | |||
| mailNickName | ≤ 64 characters | X | |
| Cannot start with a . | |||
| Cannot contain certain characters such as & | |||
| proxyAddresses | ≤ 256 characters per value | X | |
| No spaces | |||
| Diacritical marks are prohibited | |||
| sAMAccountName | ≤ 20 characters | X | X |
| Attribute | Constraints | Must | Required |
| be unique | |||
| sn | ≤ 64 characters | ||
| targetAddress | ≤ 256 characters | X | |
| No spaces | |||
| Includes a prefix (such as SMTP:). | |||
| Value after prefix adheres to the | |||
| RFC 822/2822/5322 standards | |||
| userPrincipalName | ≤ 113 characters | X | X |
| Must use a routable domain name | |||
| Unicode characters are converted | |||
| to underscores | |||
| Table 4.1 – Azure AD Connect attributes |
As you can see, very few attributes are actually required for an object to synchronize. Each attribute that is synchronized has some core requirements around formatting, including length and allowed characters. Several attributes (such as mailNickname, userPrincipalName, mail, sAMAccountName, and proxyAddresses) must contain unique values—that is, no other object in the directory of any type can share the value.
Further Reading
You can learn more about the required and supported values for attributes at https:// learn.microsoft.com/en-us/powershell/module/exchange/set-mailbox and https://learn.microsoft.com/en-us/microsoft-365/enterprise/ prepare-for-directory-synchronization.
IdFix is Microsoft’s tool for detecting common issues with on-premises AD identity data. While it doesn’t fix all possible errors, it is able to identify and remediate data formatting errors so that objects have valid data to synchronize.
IdFix supports the following features:
- Transaction rollback
- Verbose logging
- Exporting data to CSV and LDF formats for offline review and editing
To get started with the tool, follow these steps:
1.Navigate to https://aka.ms/idfix.
2. Scroll to the bottom of the page and click Next.
3. Review the prerequisites for the tool. Scroll to the bottom of the page and click Next.
4. Click setup.exe to download the file and start the installation.
5. After the installation wizard starts, click Install.
6. Acknowledge the IdFix privacy statement by clicking OK.
7. IdFix, by default, targets the entire directory. You can select Settings (the gear icon) to change the options for IdFix. You can edit the Filter option to scope to certain object types. You can also select Search Base to specify a starting point for IdFix to begin its query. After modifying any settings, click OK, as shown in Figure 4.1:

Figure 4.1 – IdFix Settings
8. Click Query to connect to Active Directory and begin the analysis.
Schema Warning
If you receive a schema warning, such as the one in Figure 4.2, you can click Yes to proceed or No to return to the IdFix tool. The schema warning is generally presented when attributes are present in the AD schema but have not been marked for replication (usually because Exchange Server has not been installed or replication hasn’t been completed successfully in your organization for an extended period of time). If you receive this error, you should check to ensure that you have at least run the Exchange Server setup with the /PrepareSchema and /PrepareAD switches and have validated that AD replication is working correctly.

Figure 4.2 – IdFix schema warning
After IdFix has analyzed the environment, results are returned to the data grid, shown in Figure 4.3.
The DISTINGUISHEDNAME column shows the full path to the object in question, while the
ATTRIBUTE column shows the attribute or property impacted. The ERROR column shows what type of error was encountered (such as an invalid character or duplicate object value). The VALUE
column shows the existing value and the UPDATE column shows any suggested value.
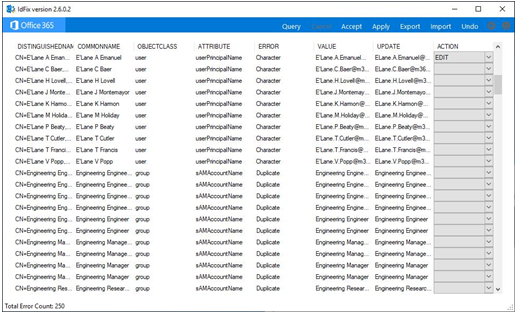
Figure 4.3 – IdFix data grid
After you have investigated an object, you can choose to accept the suggested value in the UPDATE column (if one exists). You can also choose to either enter or edit a new value in the UPDATE column.
Once you’re done investigating or updating an object, you can use the dropdown in the ACTION column to mark an object:
- Selecting EDIT indicates you want to configure the object attribute with the value in the UPDATE column
- Selecting COMPLETE indicates you want to leave the object as it is
- Selecting REMOVE instructs IdFix to clear the offending attribute
In addition, you can select Accept to accept any suggested values in the UPDATE column. Choosing this option will configure all objects with a value in the UPDATE column to EDIT, indicating that the changes are ready to be processed.
Once you have configured an action for each object, select Apply to instruct IdFix to make the changes.
IdFix will process the changes. Transactions are written to a log that can be imported and used to roll back any mistakes.
Once you have ensured that your on -premises directory data is ready to synchronize to Azure AD, you can deploy and configure one of the Azure AD Connect synchronization products.